For now I will focus on lab 18 for doing the full CLI task,
While connecting DCE, be sure to connect R1 ISP first, which will be DCE, and R2 will be DTE.
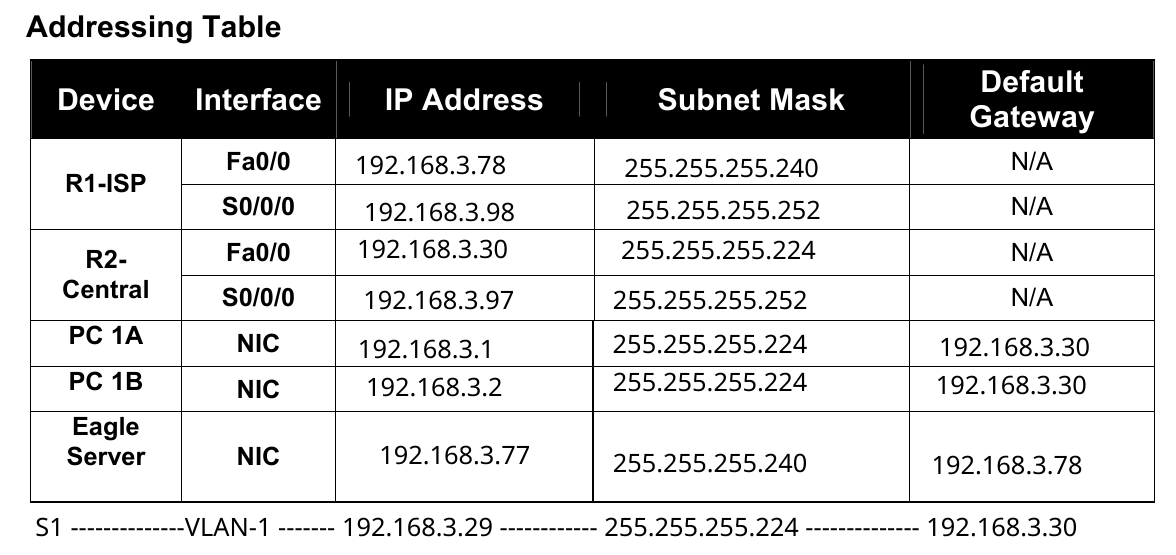
Subnetting & Addressing plan (from 192.168.3.0/24)
For the requirements (two /27s for up to 28 hosts, a /28 for up to 14 hosts, a /28 for up to 7 hosts, and a point-to-point /30) we allocate:
-
1st subnet — existing Student LAN (up to 28 hosts) 192.168.3.0 /27 → mask 255.255.255.224 Usable: 192.168.3.1 .. 192.168.3.30 (broadcast .31)
-
2nd subnet — future Student LAN (up to 28 hosts, not used now) 192.168.3.32 /27 → usable .33 .. .62
-
3rd subnet — existing ISP LAN (up to 14 hosts) 192.168.3.64 /28 → mask 255.255.255.240 Usable: 192.168.3.65 .. 192.168.3.78 (broadcast .79)
-
4th subnet — future ISP LAN (up to 7 hosts, not used now) 192.168.3.80 /28 → usable .81 .. .94
-
5th subnet — existing WAN (point-to-point) 192.168.3.96 /30 → mask 255.255.255.252 Usable: 192.168.3.97 and 192.168.3.98 (broadcast .99)
Exact IP assignments (per your rules)
Existing Student LAN (192.168.3.0/27)
- PC 1A (Fa0/1 on S1-Central): 192.168.3.1 mask 255.255.255.224
- PC 1B (Fa0/2 on S1-Central): 192.168.3.2 mask 255.255.255.224
- R2-Central Fa0/0 (gateway for student LAN) = highest usable = 192.168.3.30 mask 255.255.255.224
- S1-Central management (VLAN1) = second-highest usable = 192.168.3.29 mask 255.255.255.224
Existing ISP LAN (192.168.3.64/28)
-
R1-ISP Fa0/0 = highest usable = 192.168.3.78 mask 255.255.255.240
-
Eagle_Server (server) = second-highest usable = 192.168.3.77 mask 255.255.255.240
- Server default-gateway = 192.168.3.78
Existing WAN (192.168.3.96/30)
- R2-Central S0/0/0 = lowest usable = 192.168.3.97 mask 255.255.255.252
- R1-ISP S0/0/0 = highest usable = 192.168.3.98 mask 255.255.255.252
DNS server address (for PCs): 192.168.3.77 (the Eagle_Server)
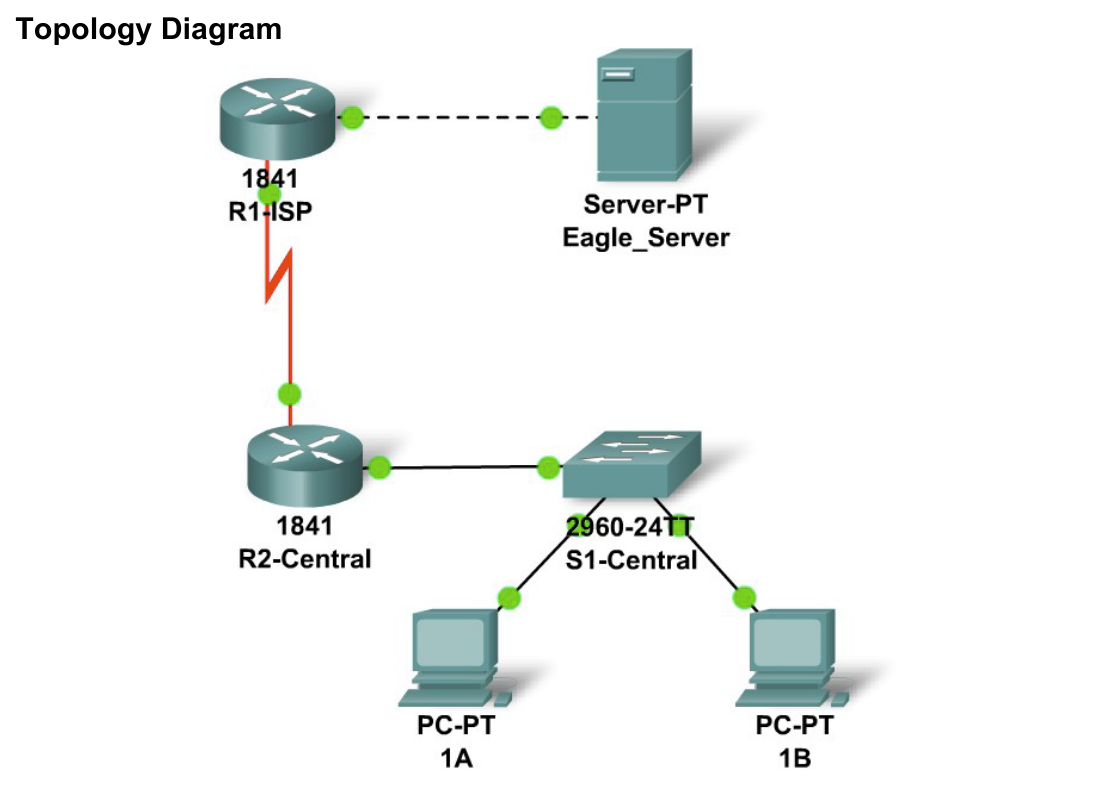
And finally, the overral image is like,
R1-ISP — full IOS config (type these on R1)
Make sure the display name in Packet Tracer for the device is R1-ISP and the hostname is set exactly as below.
R1-ISP> enable R1-ISP# configure terminal R1-ISP(config)# hostname R1-ISP R1-ISP(config)# enable secret cisco R1-ISP(config)# line console 0 R1-ISP(config-line)# password cisco R1-ISP(config-line)# login R1-ISP(config-line)# exit R1-ISP(config)# line vty 0 4 R1-ISP(config-line)# password cisco R1-ISP(config-line)# login R1-ISP(config-line)# exit R1-ISP(config)# banner motd This is lab router R1-ISP. Authorized access only.#
!— Interfaces R1-ISP(config)# interface fastEthernet 0/0 R1-ISP(config-if)# ip address 192.168.3.78 255.255.255.240 R1-ISP(config-if)# no shutdown R1-ISP(config-if)# exit
R1-ISP(config)# interface serial 0/0/0 R1-ISP(config-if)# ip address 192.168.3.98 255.255.255.252 R1-ISP(config-if)# clock rate 64000 R1-ISP(config-if)# no shutdown R1-ISP(config-if)# exit
!— Static route to Student LAN via R2 serial IP R1-ISP(config)# ip route 192.168.3.0 255.255.255.224 192.168.3.97
!— Save R1-ISP(config)# exit R1-ISP# copy running-config startup-config
R2-Central — full IOS config (type these on R2)
Set display name exactly R2-Central.
R2-Central> enable R2-Central# configure terminal R2-Central(config)# hostname R2-Central R2-Central(config)# enable secret cisco R2-Central(config)# line console 0 R2-Central(config-line)# password cisco R2-Central(config-line)# login R2-Central(config-line)# exit R2-Central(config)# line vty 0 4 R2-Central(config-line)# password cisco R2-Central(config-line)# login R2-Central(config-line)# exit R2-Central(config)# banner motd This is lab router R2-Central. Authorized access only.#
!— Interfaces R2-Central(config)# interface fastEthernet 0/0 R2-Central(config-if)# ip address 192.168.3.30 255.255.255.224 R2-Central(config-if)# no shutdown R2-Central(config-if)# exit
R2-Central(config)# interface serial 0/0/0 R2-Central(config-if)# ip address 192.168.3.97 255.255.255.252 R2-Central(config-if)# no shutdown R2-Central(config-if)# exit
!— Default route (send everything to R1-ISP serial IP) R2-Central(config)# ip route 0.0.0.0 0.0.0.0 192.168.3.98
!— Save R2-Central(config)# exit R2-Central# copy running-config startup-config
S1-Central (2960) — CLI config (type on the switch)
Make sure switch Display Name = S1-Central.
Switch> enable Switch# configure terminal Switch(config)# hostname S1-Central S1-Central(config)# enable secret cisco S1-Central(config)# line console 0 S1-Central(config-line)# password cisco S1-Central(config-line)# login S1-Central(config-line)# exit S1-Central(config)# line vty 0 4 S1-Central(config-line)# password cisco S1-Central(config-line)# login S1-Central(config-line)# exit S1-Central(config)# banner motd This is lab switch S1-Central. Authorized access only.#
!— Management interface S1-Central(config)# interface vlan1 S1-Central(config-if)# ip address 192.168.3.29 255.255.255.224 S1-Central(config-if)# no shutdown S1-Central(config-if)# exit
S1-Central(config)# ip default-gateway 192.168.3.30
!— Save S1-Central(config)# exit S1-Central# copy running-config startup-config
And testing phase…